Thursday, December 3, 2009

How to add scroll viewer with WPF ItemsControl?

How to add scroll viewer with WPF ItemsControl? Here is the trick. The bellow example is for displaying vertical scrollbar only. Some times we have little space and want to have scrollviewer support in ItemsConrol.

Note that to work correctly the ItemsControl need a fixed height. 

<ItemsControl ItemsSource="{Binding}">
<ItemsControl.Template>
<ControlTemplate TargetType="{x:Type ItemsControl}">
<ScrollViewer CanContentScroll="True" VerticalScrollBarVisibility="Auto"
HorizontalScrollBarVisibility="Disabled">
<ItemsPresenter></ItemsPresenter>
</ScrollViewer>
</ControlTemplate>
</ItemsControl.Template>
</ItemsControl.ItemsPanel>


I guess code explains everything, note that this will work on xbap, WPF, Silverlight.

Thursday, November 5, 2009

How to check if WPF control is in design mode

Probably you all know it, still sharing it with the community. The trick is pretty simple and worth knowing. Here is the summery.

Problem: The wpf designer can not render the control

Reason: In constructor of the control some data service is been called which is available only in runtime.

A method from System.ComponentModel.DesignerProperties would save our soul this time, the method name is “GetIsInDesignMode”. Using this method you can check if the control right now is been in design mode or not, and don’t call any data service if its in design mode, Isn’t it pretty simple. Bellow a sample uses is given.

if (DesignerProperties.GetIsInDesignMode(new DependencyObject()))
{
     ///your code goes here
}

References

http://msdn.microsoft.com/en-us/library/system.componentmodel.designerproperties.getisindesignmode.aspx

Friday, October 2, 2009

Turn Spell check on your WPF Text input controls.

Probably all of you know it, still want to share this simple trick that I learn, and it is “How to turn spell check on your wpf text input controls”.

What property do turn it?

SpellCheck.IsEnabled = “True”

This functionality is defined it System.windows.controls.spellcheck class, and the attach property SpellCheck.IsEnabled can be used with Textbox and RickTextBox control.

Note that appropriate language pack should be installed in the system to get full spell check support.

Unfortunately didn’t find defaults for adding new item to the dictionary, but found some articles on the net to handle the add to dictionary.

Happy coding.

Thursday, September 3, 2009

How to work in really local repository with svn.

Two things, First “I don’t want to install a source control repository”, second, “I want the source control in my local machine” finally “I want the facility to check in, check out and keep source history”, That’s actually three things, well what come in my mind is the Tortoise SVN facility.

Create A local repository

Here is how we can do the local repository, first install TortoiseSVN, its totally free so no need to worry about any licensing issue. After successful installation, select any folder from your file system, and right click on that repository. Now from TortoiseSVN menu select “Create repository here”.

image

It is going to take only a second to finish the process, Walla your local repository is created. And you will get a confirmation  like the bello window. After that you can choose to created default folder structure. Next step is to add a solution to this local repo.

image

Adding source in source control

Open your desired solution in your visual studio ide. right click on solution explorer solution file, and select Add solution to Source control. Since I have a VS plugin for svn I will get window like bello screen. It’s recommended that you add a visual studio svn plugin like Visual SVN or Ankh SVN in your development machine.

image

Click on to finish the process and you will get log message entry window.

image

Type your comment and then click ok, that’s it you have a local repository up and working for you.

Check in and checkout

Bellow I have provided the pending checking window screenshot, after adding the project you might want to add every thing un-committed to the source control.

image

History

Since you have your source control you can now check in and checkout any file, and also keep history and ability to revert the changes if anything goes wrong.

image

More over you can track history to find out any changes that is done in the source control.

image

Its fun and no worry to loose your code anymore. But I would recommend that you use a svn server, because your machine could crash, but server will have backup facility.

Until next time, me signing out cya.

Thursday, August 6, 2009

AnkhSVN : a free and full integrated SVN tool for VS IDE.

Subversion integration with VS IDE is one of the necessary things as far as Integrated development is concern. A lot of develop still do folder based file system Update, Merge and Commit while working with code based which has a source control in Subversion.

Nowadays, since the we all want the luxury of having everything accessible through visual studio ide, why not also svn. There are two important tool that come to my mind right way for svn integration.

  • Visual SVN

  • AnkhSVN

No doubt that Visual SVN is a wonderful tool that have full integrated feature with visual studio, but main problem with it is that its not free and a commercial tool. If we use express edition of visual studio and want svn integration we might not want to pay for it.

There AnkhSVN wins, its totally free, for distribution and use. The tool is can be download from http://ankhsvn.open.collab.net/. Ankh SVN is fully integrated and free tool for svn support in visual studio.

Features are given bellow and taken from the AnkhSVN Site.

Features

Pending Changes window

  • One window to handle the normal workflow.
  • Real-time overview of all project changes.
  • Easy access to most Subversion commands.

Merge Tracking

  • Easy-to-use wizard simplifies merging.
  • Wizard is merge-tracking aware.
  • Intuitive integrated conflict resolution
  • Supports all merge scenarios supported by Subversion 1.5/1.6
  • Works with Subversion 1.5+ servers, and pre-1.5 servers.

Optimized workflow

  • Don't leave your IDE for most common operations.
  • Immediately view the source control status of all files in your project/solution.
  • View working copy information such as last committed author, last committed date and the repository URL.
  • Import new solutions automatically.
  • Get support for all Subversion transfer protocols.

Pluggable diff/merge

  • Plug in your diff/merge tool of choice
  • Smart command line templates for the most common merge tools.

Repository Explorer

  • Easily browse any Subversion repository.
  • View extended information about remote files and directories in the Visual Studio Properties window.

License

  • AnkhSVN 2.1 is licensed under the open source Apache 2.0 license.

After installation we can use and when we add the our solution to source control the solution explorer is pretty much looks like the following screen shot.

image

Bellow the pending checking window for AnkhSVN is given.

image

Hope you will like this tool and use open source solution. Until next time cya.

Friday, July 3, 2009

Most common design principles

“In computer programming, SOLID (Single responsibility, Open-closed, Liskov substitution, Interface segregation and Dependency inversion) is a mnemonic acronym introduced by Robert C. Martin in the early 2000s which stands for five basic principles of object-oriented programming and design.” by Wikipedia

Most common and famous design principles are given bellow. And some rapid fire definition to remember. Often I wonder what is the best way to train you so that you always follow the design principles. Best answer is there is non, and practice is the key to success.

What is more important?

Design Pattern, Design Principles, Code Smell, or refactoring, an honest answer is all of them. So if we want to become more productive developer and enhance the learning and knowledge we ought to learn and get by heart those key words and practice them.

Until next time, happy coding.

Friday, June 5, 2009

How to add scrollbars to ItemsControl on WPF?

 
There are two ways to do this. The simpler and most easier way is to warp the ItemsControl with a ScrollViewer, but there are some other problems on this solution. Each case we might want to use ScrollViewer. In those case we can modify the  control template and add proper code in ControlTemplate so that we do not have any problem layout.
 
Bellow few simple line of codes is given to demonstrate the idea.
<ItemsControl ItemsSource="{Binding EventWithoutDateColumns}" Margin="10">
<ItemsControl.Template>
<ControlTemplate>
<ScrollViewer x:Name="ScrollViewer" Padding="{TemplateBinding Padding}">
<ItemsPresenter />
</ScrollViewer>
</ControlTemplate>
</ItemsControl.Template>
</ItemsControl>

There are some other way to do that, and that is, to use styles and also apply the style globally so that it effect the whole application. In this way the whole application will have ScrollViewer with particular style in every ItemsControl.


Bellow few simple line of code is given Bellow.


<Style TargetType="{x:Type ItemsControl}">
<Setter Property="Template">
<Setter.Value>
<ControlTemplate>
<ScrollViewer x:Name="ScrollViewer" Padding="{TemplateBinding Padding}"
HorizontalScrollBarVisibility="Disabled"
VerticalScrollBarVisibility="Auto">
<ItemsPresenter />
</ScrollViewer>
</ControlTemplate>
</Setter.Value>
</Setter>
</Style>

Hope this helps to somebody, Cheers.

Friday, May 8, 2009

Use Iron Speed Designer to build data driven web application in a minute

It’s been in the market for a while and lots of people and organization have taken advantage of this awesome tool , the magic is it can build a professional looking web application in a flash. And the developer need to prior programming experience what so ever, well the person need programming experience if you need customization but it’s the advanced scenario.

Here is what that said about the tool

“Simply point to an existing database and let Iron Speed Designer create a visually stunning, feature-rich Web 2.0 application that is easy to customize and ready to deploy. In just minutes you’ll get a complete .NET Web application without programming. Applications are a snap to customize using our simple layout editor, wizards and toolbox. No knowledge of HTML or .NET is required”

image

of Couse it’s not a free tool and you have some financial bottleneck with it, You can download trail and explore this awesome tool if you like from http://www.ironspeed.com. Here is what they claim.

image

If you start building the application using Iron Speed Designer, the tool also shows how much developer is been saved and how much money is been saved, not everyone wants to know about it Smile but it’s a smart marketing policy.

Monday, April 20, 2009

ASP.NET AJAX Control Toolkit ModalPopupExtender Control in Action

Table of Contents

Development Platform

  • Visual Studio 2008 SP1
  • Microsoft .NET Framework 3.5 SP1
  • ASP.NET Ajax 3.5 SP1
  • ASP.NET Ajax control toolkit for 3.5 SP1
  • IIS 5.1~7
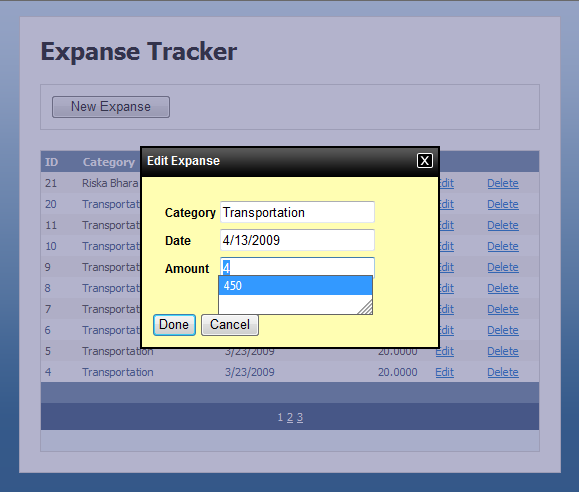
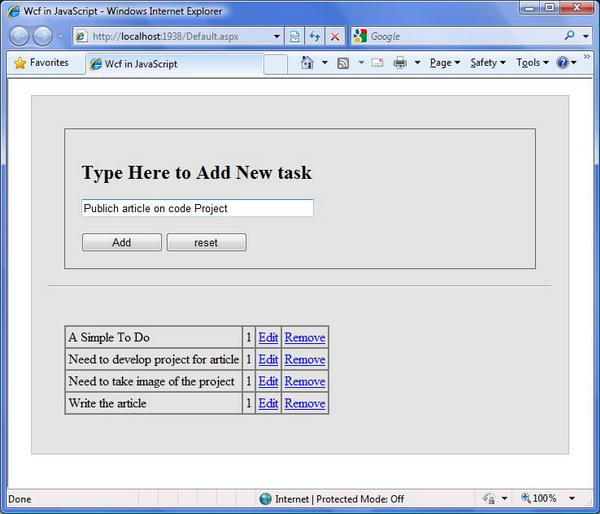
Figure: Expense listing demo application.

Introduction

ASP.NET Ajax control kit is a nice contribution from the ASP.NET community, which is equipped with a lot of good and handy control extenders. In this article, we are going to explore modal popup dialog extender control of Ajax control toolkit. We are going to see various scenarios in which modal popup controls can become a handy tool to use in ASP.NET rich clients and also in general purpose web applications. We will also cover few tricks and trouble shooting about modal popup extender control. First of all, we are going to cover what modal popup extender is and how we can use it.

Display a Modal Popup

Let's begin our journey by starting a hello world modal popup. In this section, we are going to see how we can use modal popup extender control to display modal popup. The best way to learn any new technology is by example. So let us put down a small example code and then we are going to see what the code means and how it works.

<asp:scriptmanager id="ScriptManager1" runat="server">
</asp:scriptmanager>

<asp:button id="Button1" runat="server" text="Button" />

<cc1:modalpopupextender id="ModalPopupExtender1" runat="server"
cancelcontrolid="btnCancel" okcontrolid="btnOkay"
targetcontrolid="Button1" popupcontrolid="Panel1"
popupdraghandlecontrolid="PopupHeader" drag="true"
backgroundcssclass="ModalPopupBG">

</cc1:modalpopupextender>

<asp:panel id="Panel1" style="display: none" runat="server">
<div class="HellowWorldPopup">
<div class="PopupHeader" id="PopupHeader">Header</div>

<div class="PopupBody">
<p>This is a simple modal dialog</p>
</div>
<div class="Controls">
<input id="btnOkay" type="button" value="Done" />

<input id="btnCancel" type="button" value="Cancel" />
</div>
</div>

</asp:panel>


The above code is self explanatory but still we are going to discuss it in a step by step manner.


Step 1


The engine behind the extender control is the Script Manager of ASP.NET Ajax 3.5. It must be declared in the page context as long as we want to use any extender control. So go ahead and drag drop scriptmanager from toolbox or write a tag for a Script Manager.


Step 2


Now add a Div or ASP.NET panel in the page that you want to display as a modal dialog. Give an id of the panel and put done and cancel button in the panel. Do add a header div in the panel, which will serve as a header of the popup. Last of all, add a target link or button anywhere in the page except inside the div that you want to show as a modal popup. Clicking on the link for the popup will make the popup display.


Step 3


Now add a modal popup extender control in the page and set the TargetControlID property to the id of the button on which the user will click to show the modal. Set PopupControlID property to the id of the ASP panel which you want to show as a modal. Last of all, set CancelControlID property to "btnCancel" and OkControlID property to "btnOkay".


Step 4


All is set, it's time to add a few styles so that we have a light box effect when the modal is displayed. The below two styles are given for demonstration purposes. But the important thing is that if we want to add transparency/light box effect on the page, we have to set the CSS of the modal popup extender. To achieve the effect, we add a background color and then apply a filter and the opacity CSS attributes. Then we must add styles to your popup dialog. All done. Now hit the target button and a modal popup will pop up.


.ModalPopupBG
{
background-color: #666699;
filter: alpha(opacity=50);
opacity: 0.7;
}

.HellowWorldPopup
{
min-width:200px;
min-height:150px;
background:white;
}


Close and Open Modal Popup Using Script


While developing applications, we might have a requirement to show the modal popup from JavaScript, that we might need to open the popup and also close the popup dynamically using JavaScript. For example, a warning message that stays for only 2 seconds and then automatically closes. There are a couple of tricks to do that. We are going to discuss mostly all of them. First let's discuss how we can open a modal popup without hitting a button or link. Assume that we have a modal popup all set in the page, and on page load we have to display a warning message. First we have to hide the target control id and the control buttons of the modal popup using style="display:none". Then we have to add BehaviorID property of modal popup extender control. Now define script to do our trick on pageLoad. PageLoad is a function that script manager automatically invokes when the page is loaded on the client side. In page load, we are going to add code to show the modal and again hide the popup after some period.


To show the popup, we are going to use $find('behaviourIDofModal').show(); and to hide the modal, we are going to use $fin('behaviourIDofTheModal').hide();. Alternately we can auto raise the click JavaScript event of the targetcontrolid using JavaScript to show the popup and also raise the click event of the cancel control of the popup to hide the popup again.


<script language="javascript" type="text/javascript">
function pageLoad() {
ShowPopup();
setTimeout(HidePopup, 2000);
}

function ShowPopup() {
$find('modalpopup').show();
//$get('Button1').click();
}

function HidePopup() {
$find('modalpopup').hide();
//$get('btnCancel').click();
}

</script>


Display an iframe Inside Modal Popup


In this section, we are going to see how we can use an iframe inside the modal popup and discuss some scenarios in which it can become handy to use an iframe inside the modal popup. Let's get started with a simple example. In this example, we are going to use a modal popup that will be used as a three step wizard control to add a new expense item. The wizard will be a separate page in which we will put our three steps beside a multiview ASP.NET control. In the first step, we are going to show the input panel for the client, upon use save data we are going to display a simple success message or an error message. If the data is saved successfully, the modal will close after showing the success message and if error occurs, we will show the error message and take us to the first step again. We will also implement the whole wizard in a separate aspx page and we will display this page using an iframe inside a modal popup.


In this section, we have a few problems. First the okay and cancel button of the modal. Since okay and cancel button of wizard are part of the wizard that is inside the iframe modal popup, extender will be unable to find it while loading the extender in the first place. So we got to add okay and cancel controls outside an iframe and then hide the controls. In a later section, we are going to see how we can handle the okay and cancel from the iframe source page.


Code in Host Page


<asp:button id="btnAddNew" runat="server" text="New Expanse" />

<cc1:modalpopupextender id="ModalPopupExtender1"
runat="server" cancelcontrolid="btnCancel"
okcontrolid="btnOkay" targetcontrolid="btnAddNew"
popupcontrolid="Panel1" popupdraghandlecontrolid="PopupHeader"
drag="true" backgroundcssclass="ModalPopupBG">

</cc1:modalpopupextender>

<div class="popupConfirmation" id="Panel1" style="display: none">
<iframe id="frameeditexpanse" src="EditExpanse.aspx" frameborder="0">

</iframe>
<div class="popup_Buttons" style="display: none">
<input id="btnOkay" type="button" value="Done" />

<input id="btnCancel" type="button" value="Cancel" />
</div>
</div>


Code in Source Page


<form id="form1" runat="server">
<div class="popup_Container">
<div class="popup_Titlebar" id="PopupHeader">

<div class="TitlebarLeft">
Edit Expanse
</div>
<div class="TitlebarRight" onclick="cancel();">
</div>

</div>
<div class="popup_Body">
<%--The content will go here--%>
</div>
<div class="popup_Buttons">

<input id="btnOkay" type="button" value="Done" runat="server" />
<input id="btnCancel" onclick="cancel();" type="button" value="Cancel" />

</div>
</div>
</form>


Close Popup from iframe


We have already seen how to show a framed content inside a modal popup. In this section, we are going to see how we can close the modal popup from the iframe source page. As we can see in the above source code, we have put our okay and cancel control twice. The okay and cancel button that are defined in the host page are for the popup extender, so that we can refer the buttons to the modal popup extender which will save us from any runtime error. We also have two okay and cancel buttons in the source page of iframe, which will be used by the user to do okay and cancel the dialog. The host page's buttons are hidden to the user.


In modal popup, if we put our okay and cancel buttons outside the iframe and if we click any of those buttons, it will close the modal regardless of whether we finish the job inside the modal or not. The code is given below.


C# Code in iframesourcepage codebehind


protected void btnOkay_Click(object sender, EventArgs e)
{
try
{
// code will go here
MultiViewExpanse.ActiveViewIndex = 1;
ClientScript.RegisterStartupScript(this.GetType(),
"onload", "onSuccess();", true);
}
catch
{
ClientScript.RegisterStartupScript(this.GetType(),
"onload", "onError();", true);
MultiViewExpanse.ActiveViewIndex = 1;
}
}


JavaScript Code in iframesourcepage HTML


<script language="javascript" type="text/javascript">
function getbacktostepone() {
window.location = "EditExpanse.aspx";
}
function onSuccess() {
setTimeout(okay, 2000);
}
function onError() {
setTimeout(getbacktostepone, 2000);
}
function okay() {
window.parent.document.getElementById('btnOkay').click();
}
function cancel() {
window.parent.document.getElementById('btnCancel').click();
}
</script>


When user hits the okay button in the wizard, we perform some operation and then we raise the click event of the host page's okay or cancel button to dismiss the dialog.


Same Source Different Data in Side iframe


In the previous example, we have seen how we can display a framed content inside a modal popup. In this section, we are going to discuss about displaying a customized version of framed content in modal popup. In our expense listing example, we have an edit button in gird item. Let's say we don't want in place editing and when user clicks on the edit button, a modal window will popup with its relevant data. There are many ways to implement this requirement. But for now, we are going to use iframe inside a modal and change the source of the iframe and add appropriate query string to the src property to show that it shows relevant data in the modal.


In rowdataboundevent, we have changed the attribute of the edit button to show a modal window. Configure the modalpopupextender in such a way so that its target control id does not show up. When user clicks on edit button on any item, a client JavaScript function is invoked with argument expense id. Now all we have to do is to set the iframe src property and then display the popup using client JavaScript. Below the complete code is given for better understanding.


Code in RowDataBound Event


protected void GridView1_RowDataBound(object sender, GridViewRowEventArgs e)
{
if (e.Row.RowType == DataControlRowType.DataRow)
{
Expanse expanse = e.Row.DataItem as Expanse;
(e.Row.FindControl("lnkEdit") as LinkButton).Attributes.Add
("onClick", "ShowEditModal('" + expanse.ID + "');");
(e.Row.FindControl("lnkDelete") as LinkButton).CommandArgument =
expanse.ID.ToString();
}
}


Code for Modal Popup


<asp:button id="ButtonEdit" style="display: none" runat="server" text="Edit Expanse" />

<cc1:modalpopupextender id="ModalPopupExtender2" runat="server"
cancelcontrolid="ButtonEditCancel" okcontrolid="ButtonEditDone"
targetcontrolid="ButtonEdit" popupcontrolid="DivEditWindow"

backgroundcssclass="ModalPopupBG" oncancelscript="EditCancelScript();"
onokscript="EditOkayScript();" behaviorid="EditModalPopup">
</cc1:modalpopupextender>

<div class="popup_Buttons" style="display: none">
<input id="ButtonEditDone" type="button" value="Done" />

<input id="ButtonEditCancel" type="button" value="Cancel" />
</div>
<div class="popupConfirmation" id="DivEditWindow" style="display: none">

<iframe id="IframeEdit" frameborder="0" scrolling="no" height="203">
</iframe>
</div>


Code in JavaScript


<script language="javascript" type="text/javascript">
function ShowEditModal(ExpanseID) {
var frame = $get('IframeEdit');
frame.src = "EditExpanse.aspx?UIMODE=EDIT&EID=" + ExpanseID;
$find('EditModalPopup').show();
}
function EditCancelScript() {
var frame = $get('IframeEdit');
frame.src = "DemoLoading.aspx";
}
function EditOkayScript() {
RefreshDataGrid();
EditCancelScript();
}
function RefreshDataGrid() {
$get('btnSearch').click();
}

</script>


We can do a few tricks to show the page transaction from one edit window to another a little bit better. we will keep the source of the iframe to a demo page which says loading, when user clicks on loading and the ShowEditModal is invoked, then in that function we will set the appropriate src to load appropriate content. When user clicks okay or cancel, we will again reset the source to the demo page. The script given in the above code listing demonstrates the same idea.


Update Panel inside modalpopup


Update panel is the most easy and friendly control that we use while using ASP.NET Ajax in our web applications. In this section, we are going to see a few tricks about update panel inside modal popup extender. If we want to make the framed content even better, we can use update panel and other client side facility inside the source page. But in this case, we have to be sure that the HTTP Cache is refreshed properly. Just put the below code in page load to avoid unnecessary page cache. But you may also want to keep cache; in that case do use HTTP cache properly.


Response.Cache.SetCacheability(HttpCacheability.NoCache);


Now let's talk about normal modal popup with a update panel inside. If we have a wizard inside the update panel, after the job is done we might want to make the wizard go to step one so that when user clicks the start wizard, the wizard starts from the beginning. In that case, use a hidden input button which will act as client trigger to update the update panel. And in click event of the button, reinitialize the wizard. Last of all, add necessary click script in onokayscript and oncancelscript to raise click event of the button to run the process. So when the user finishes or perhaps goes through few steps and then cancels the wizard, he will be able to start from the beginning after clicking start wizard.


Problem with validatorcalloutextender Inside Modal Popup


In this section, we are going to show another problem and trouble shooting of modal popup. It's about the validators and validatorcalloutextender. when we have an input panel in side a modal popup, we might want to incorporate some required field, or regular expression validator along with validator callouts. As you all have already guessed, the ASP.NET validator and validator callouts don't work properly inside modal popup extender. When user puts data inside an input panel which is located inside the modal popup and clicks okay to finish the operation, we might want to take the input and perform some operation and eventually clear input panel for new panel. When user clicks to show modal popup, the validatorcalloutextender pops up even though user didn't perform any operation. There is a simple workaround for this problem and we got to use it. Given below is the complete code listing:


<asp:button id="Button1" runat="server" text="Click here to show the modal" 
causesvalidation="false" />

<cc1:modalpopupextender id="ModalPopupExtender1" runat="server"

cancelcontrolid="btnCancel" targetcontrolid="Button1"
popupcontrolid="Panel1" popupdraghandlecontrolid="PopupHeader"
drag="true" backgroundcssclass="ModalPopupBG" oncancelscript="ClearUI();"

behaviorid="modalwithinput">
</cc1:modalpopupextender>


Note that in the above code, we have marked our target control's cause validation property to false. This is necessary otherwise when we click on the button, the popup will get launched with a validation callout already popped and in an invalid location, just like the figure shown below:


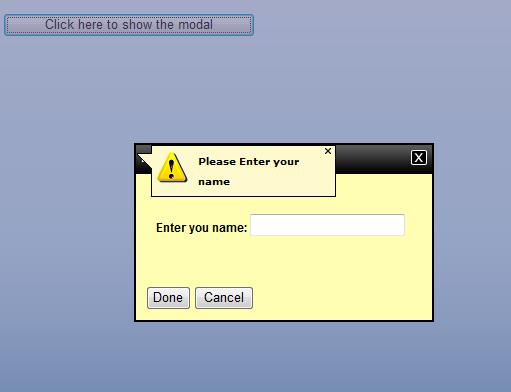
Figure: Validator Callout with visual dislocation.


Below the code for the popup body is given where we have added the ValidatorCalloutExtender. Here we have to set the RequiredFieldValidator's Display property to None, otherwise the message for both required field validator and validator callout will be shown.


<div class="popup_Body">
<p>Enter you name:
<asp:textbox id="TextBox1" runat="server"></asp:textbox>
<asp:requiredfieldvalidator id="RequiredFieldValidator1" runat="server"

controltovalidate="TextBox1" errormessage="Please Enter your name"
setfocusonerror="true" display="None"></asp:requiredfieldvalidator>
<cc1:validatorcalloutextender id=
"RequiredFieldValidator1_ValidatorCalloutExtender"

runat="server" targetcontrolid="RequiredFieldValidator1"
behaviorid="textValidator" enabled="True">
</cc1:validatorcalloutextender>

</p>
</div>


The main script that actually does the trick is given below. You may note that we didn't mention any okaycontrolid or onokayscript in the modalpopupextender, rather we have included a client script in the onclientclick property of the okay button. In that okay button click we validate if the input is actually valid or not, then we manually close the popup if the input is valid otherwise keep the popup open and the validator callout automatically gets popped if the input is invalid. Next when we have a valid input or user clicks on cancel, we clear the input for the next round. Note that we have hidden the validatorcallout manually in the clearUI() function.


<script language="javascript" type="text/javascript">
function ClearUI() {
$find("textValidator").hide();
$get("TextBox1").value = "";
}
function IsValid() {
var textbox = $get("TextBox1");
if (textbox.value == "") {
return false;
}
else
return true;
}
function ClosePopup() {
if (IsValid()) {
$find('modalwithinput').hide();
alert("You have given your name");
ClearUI();
}
}

</script>


Using Modal Popup as Interaction Confirmation Dialog


Most of the application we develop for web uses some kind of okay and cancel dialog to some extent in few areas, especially when we want to delete some data or perform an important modification on data. Generally we use window.alert() and window.confirm to show such kind of message to return user confirmation and perform operation upon user confirmation dialog result. ASP.NET Ajax control toolkit has an extender control called ConfirmButtonExtender which can also be used to show custom modal popup rather than the window.confirm and is used especially for confirmation dialog.


Let's visualize a scenario in which a user wants to delete one of the expenses from the grid clicking on Button delete. User must be alerted that she/he is going to delete one of his expenses. We will show a modal dialog in which we will ask the user whether she/he really intended to delete or not. Below the full code listing is given to demonstrate the idea a little bit better.


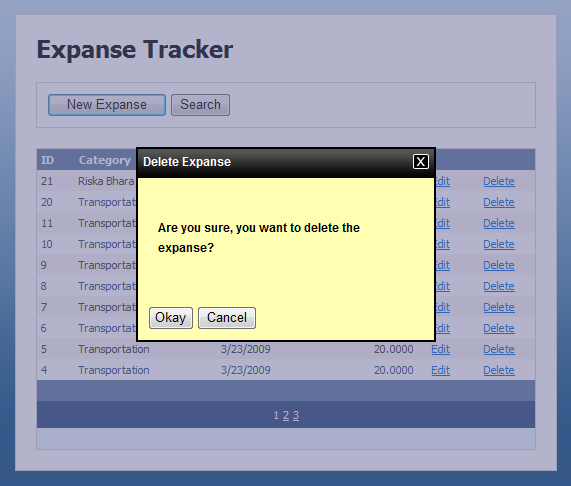
Figure: ConfirmButtonExtender with modal popup.


A simple code is given below to demonstrate the idea of ConfirmButtonExtender with modal popup:


<asp:templatefield showheader="False">
<itemtemplate>

<asp:linkbutton id="lnkDelete" runat="server" text="Delete"
causesvalidation="false" commandname="Delete" commandargument="ID">

</asp:linkbutton><cc1:modalpopupextender
id="lnkDelete_ModalPopupExtender" runat="server"
cancelcontrolid="ButtonDeleteCancel" okcontrolid="ButtonDeleleOkay"
targetcontrolid="lnkDelete" popupcontrolid="DivDeleteConfirmation"
backgroundcssclass="ModalPopupBG">

</cc1:modalpopupextender>
<cc1:confirmbuttonextender id="lnkDelete_ConfirmButtonExtender"
runat="server" targetcontrolid="lnkDelete" enabled="True"
displaymodalpopupid="lnkDelete_ModalPopupExtender">

</cc1:confirmbuttonextender>
</itemtemplate>
<itemstyle horizontalalign="Center" />
</asp:templatefield>


Code for the modal popup which is used to display as confirm window.


<asp:panel class="popupConfirmation" id="DivDeleteConfirmation" 
style="display: none" runat="server">
<div class="popup_Container">

<div class="popup_Titlebar" id="PopupHeader">
<div class="TitlebarLeft">
Delete Expanse</div>
<div class="TitlebarRight" onclick="$get('ButtonDeleteCancel').click();">

</div>
</div>
<div class="popup_Body">
<p>
Are you sure, you want to delete the expanse?
</p>

</div>
<div class="popup_Buttons">
<input id="ButtonDeleleOkay" type="button" value="Okay" />

<input id="ButtonDeleteCancel" type="button" value="Cancel" />
</div>
</div>

</asp:panel>


Summary


In this article, we have seen a few scenarios in which we can use modal popup extender control of ASP.NET Ajax control toolkit. We have also learned few tricks and tips about modal popup extender. Many more interesting scenarios are out there to explore and many more areas to cover where we can use this modal popup. Please drop a comment if you feel that any part of the article is not clear. I would love to explain more about it and solve any difficulty that users might face while adding their modals. Last of all, if you liked the article, please vote for it.


References


History


  • 2nd April, 2009: Initial version


Thursday, March 5, 2009

Open source Web templates : http://www.oswt.co.uk

Open source Web templates : http://www.oswt.co.uk, An interesting site where lots of free web templates available for download. I must say it’s a nice site.

If we are thinking about a quick product that needs some styling and right now we don’t have enough time to invest on design, I would recommend find some useful template from here and using it right way.

image

The templates are not that much rich but not bad either, specially for students who are developing web product for there class assignment can take advantages of using good theme in there projects.

Monday, February 9, 2009

A Beginner's Guide for "Using WCF in JavaScript using Asp.net Ajax"

Contents

    1. Development Platform
    2. Introduction
    3. Using Ajax-Enabled WCF Service item template
    4. Using Service Interface defined in a class library
    5. Configure the Web Application To Use TODO Service
    6. Using Service In JavaScript
    7. Summery
    8. References

Development Platform

  • Visual Studio 2008 SP1
  • Dot.net Framework 3.5 SP1
  • Asp.net Ajax
  • IIS7 or VS Integrated Web Server [WCF and SVS file configured]
  • Windows Vista

Introduction

WCF (Windows communication foundation) added lot of new capability in Microsoft application development platform, particularly in case of how applications communicate to each other. In this article we are going to see how WCF can be used directly from clients JavaScript code. Its a very cool future provided by asp.net Ajax. In this article we are not going to cover every theory about WCF internals rather we only remained focused on how to use the service directly from JavaScript. So no behind the scene stuff of how asp.net or dot net runtime manage this feature.

To demonstrate the ideas and facts we are going create a demo solution with two projects. So with no time waste create a blank solution and save it. Now add a class library project to the solution. Name the class library as "ServiceLibrary". Now Add another web application project to the solution and name it as WEBUI. We are going to see two approach to add WCF service that can be consumed from JavaScript.

  1. Using Ajax-Enable WCF Service item template
  2. Using Service Interface defined in a class library

Using Ajax-Enabled WCF Service item template

Its a very strait forward way to use WCF service in JavaScript. Right Click on the web application project and select add new item. Select Ajax-Enabled WCF Service item template name it as "HelloWorldService.svc" and click ok. Wizard will add a HelloWorldService.svc file to solution as expected. This file have a code behind file as well. If you open the HelloWorldService.svc in xml file editor you will see a markup like this

<%@ ServiceHost Language="C#" Debug="true" Service="WebUI.HelloWorldService"

CodeBehind="HelloWorldService.svc.cs" %>


And if you open the code behind file you will se code some thing like this


namespace WebUI
{
[ServiceContract(Namespace = "")]
[AspNetCompatibilityRequirements(RequirementsMode = AspNetCompatibilityRequirementsMode.Allowed)]
public class HelloWorldService
{
// Add [WebGet] attribute to use HTTP GET
[OperationContract]
public void DoWork()
{
// Add your operation implementation here
return;
}

// Add more operations here and mark them with [OperationContract]
}
}


Visual Studio 2008 automatically add the necessary configuration for you in the web.config file so no need to configure any thing in web.config. Now go ahead and add a method like HelloWorld() which returns a string "HelloWorld" and add [OperationContract] method attribute to the method. we will explain what the attributes are for later in this article. Now add a page to web application project and name it as "HelloWorldTest.aspx". Drag drop a script manager item from visual studio tool box. Inside the ScriptManager tag add service reference of the service. Bellow a example code is give.


<asp:ScriptManager ID="ScriptManager1" runat="server">
<Services>
<asp:ServiceReference Path="~/HelloWorldService.svc" />
</Services>
</asp:ScriptManager>


Now add a button and a textbox to the page and on button click use a JavaScript function to call the service. when you will write the service call function Visual Studio 2008 Html Editor will provide intellisense to write necessary function call. Full code of html part is give bellow.


<form id="form1" runat="server">
<div>
<script language="javascript" type="text/javascript">
function GetValueFromServer() {
HelloWorldService.HelloWorld(onSuccess, onFailure);
}

function onSuccess(result) {
document.getElementById('txtValueContainer').value = result;
}

function onFailure(result) {
window.alert(result);
}
</script>
<asp:ScriptManager ID="ScriptManager1" runat="server">
<Services>
<asp:ServiceReference Path="~/HelloWorldService.svc" />
</Services>
</asp:ScriptManager>
<input id="btnServiceCaller" type="button" value="Get Value" onclick="GetValueFromServer()"; />
<input id="txtValueContainer" type="text" value="" />
</div>
</form>


Note that when calling the service we have passed two method one is for callback and other one is for error callback. If we need to pass any parameters to the function parameters will go first and then the call back. So if we have a function name getvalue which take two string parameters as argument we are going to call the function as [NameSpaceName].[ServiceName].getvalue("value one","value two",on_success,on_error); where on_sucess and on_error are callback and error callback respectively.


Using Service Interface defined in a class library


So we have looked how to use a Ajax-Enabled WCF Service using item template. Now we are going to see more traditional WCF Service implementation and we are also going to see how we can expose this service for Asp.net Ajax. when we created the class library project by default its not added with the service model and runtime serialization support which is necessary to run WCF. So we got to add the necessary service references. so go ahead and right client on class library project and select add reference and then select the references.


  1. System.Runtime.Serialization


  2. System.ServiceModel


In this phase we are going to use a TODO Management example to demonstrate the whole idea. Add A Service Based Database and then create a TODO Table with ID,Description and Status Field. Now Add A LinkToSQL class file from item template. Drag Drop the table TODO from database to link to SQL Class File designer. Now Click on the designer surface and from property window change the Serialization Mode to Unidirectional. Now our designer generated Link to SQL classes are ready to use for WCF. If you want to use custom user defined types you must set [DataContract] class attribute to your class and you must add [DataMember] property attribute to each property of the class you want to expose to WCF.


Now we are going to add a service interface like this


namespace ServiceLibrary
{
[ServiceContract(Namespace = "ServiceLibrary")]
interface IToDoService
{
[OperationContract]
ToDo GetToDo(long ID);
[OperationContract]
ToDo AddToDo(ToDo toDo);
[OperationContract]
bool DeleteToDo(ToDo todo);
[OperationContract]
ToDo UpdateToDo(ToDo todo);
[OperationContract]
List<ToDo> GetAllToDo();
}
}


Note that we have mentioned a name space in side the ServiceContract interface Attribute. This is very important. we are going to use this name as the service name in side the JavaScript to access the services. Now we are going to add the implementation to this service interface the code is given bellow. Please note that in bellow code i have used [AspNetCompatibilityRequirements(RequirementsMode = AspNetCompatibilityRequirementsMode.Allowed)] class attribute, this is must requirement for exposing the service as asp.net Ajax enabled WCF service.


namespace ServiceLibrary
{
[AspNetCompatibilityRequirements(RequirementsMode = AspNetCompatibilityRequirementsMode.Allowed)]
public class ToDoService : IToDoService
{
#region IToDoService Members
public ToDo GetToDo(long ID)
{
DataClasses1DataContext context = new DataClasses1DataContext();
var toDos = from p in context.ToDos
where p.ID == ID
select p;
List<ToDo> listTodos = toDos.ToList();
if (listTodos != null && listTodos.Count > 0)
{
return listTodos[0];
}
else
{
return null;
}
}

//all the methods is not shown

#endregion
}
}


Configure the Web Application To Use TODO Service


Now that we have defined all the necessary stuff to run our TODO Application its time to expose the service to the client as a asp.net Ajax enabled WCF service. For this we are going to add a Ajax-Enabled WCF Service .svc file. And we will get rid of the code behind file. or we can add a xml file or text file and then rename it to ToDoService.svc. Open it with xml editor and put directive like bellow


<%@ ServiceHost Language="C#" Debug="true" Service="ServiceLibrary.ToDoService" %>


Now we are going to put necessary configuration to run this service in web.config, the code is given bellow


<system.serviceModel>
<behaviors>
<endpointBehaviors>
<behavior name="AspNetAjaxBehavior">
<enableWebScript />
</behavior>
<behavior name="WebUI.HelloWorldServiceAspNetAjaxBehavior">
<enableWebScript />
</behavior>
</endpointBehaviors>
</behaviors>
<serviceHostingEnvironment aspNetCompatibilityEnabled="true" />
<services>
</service>
<service name="ServiceLibrary.ToDoService">
<endpoint behaviorConfiguration="AspNetAjaxBehavior" binding="webHttpBinding"
contract="ServiceLibrary.IToDoService" />
</service>
<service name="WebUI.HelloWorldService">
<endpoint address="" behaviorConfiguration="WebUI.HelloWorldServiceAspNetAjaxBehavior"
binding="webHttpBinding" contract="WebUI.HelloWorldService" />
</service>
</services>
</system.serviceModel>


Now right click on the file and select view in browser to see the service is up and running well. Few things must be mentioned before moving to next phase. You must add serviceHostingEnvironment and set its aspNetCompatibilityEnabled="true" to be able to use wcf service in asp.net with its features like httpContext, Session etc.


Using Service In JavaScript


Now use the service just like HelloWorldService we have previously used. Bellow I have given few example code to make things clear. Bellow the ScriptManager Mark up is given. Note that we have added a clientServiceHelper.js file. We have put all the client to WCF communication JavaScript functions in that file.


<asp:ScriptManager ID="ScriptManager1" runat="server">
<Scripts>
<asp:ScriptReference Path="~/Script/ClientServiceHeler.js" />
</Scripts>
<Services>
<asp:ServiceReference Path="~/ToDoService.svc" />
</Services>
</asp:ScriptManager>


We have used asp.net Ajax client side object oriented model to write bellow JavaScript client code which are the part of clientServiceHelper.js.


Type.registerNamespace("ServiceClients");

ServiceClients.ToDoClient = function() {
}

ServiceClients.ToDoClient.prototype = {

AddToDo: function(todo, callback, errorCallBack) {
ServiceLibrary.IToDoService.AddToDo(todo, callback, errorCallBack);
},

DeleteToDo: function(todo, callback, errorCallBack) {
ServiceLibrary.IToDoService.DeleteToDo(todo, callback, errorCallBack);
},

UpdateToDo: function(todo, callback, errorCallBack) {
ServiceLibrary.IToDoService.UpdateToDo(todo, callback, errorCallBack);
},

GetAllToDo: function(callback, errorCallBack) {
ServiceLibrary.IToDoService.GetAllToDo(callback, errorCallBack);
},

dispose: function() {
//disposed
}
}

ServiceClients.ToDoClient.registerClass('ServiceClients.ToDoClient', null, Sys.IDisposable)

// Notify ScriptManager that this is the end of the script.
if (typeof (Sys) !== 'undefined') Sys.Application.notifyScriptLoaded();


Summery


In this article we have seen how we can use Ajax-Enable WCF Service item template. The we have seen how we can use a service interface based wcf service. we have also seen how to configure web.config to use the services, last of all we have seen how we can add service reference in ScriptManager. Few things must be mentioned before ending this article we can also add service reference in c# code below a simple code example is given.


ScriptManager manager = ScriptManager.GetCurrent(Page);
ServiceReference reference = new ServiceReference("ToDoService.svc");
manager.Services.Add(reference);


If the beginners encounter problem of not understanding any particular portion of the article please drop a message. You can learn the ABC of WCF here. If you have any difficulty configuring WCF in IIS please see this article here.


References


  1. http://msdn.microsoft.com/en-us/library/aa480190.aspx [WCF - ABC]


  2. http://munna.shatkotha.com/Blog/post/2008/07/08/Install-WCF-Aspnet-in-IIS7.aspx [Configure WCF]


  3. http://msdn.microsoft.com/en-us/library/bb514961.aspx [Expose WCF to Client Script]


  4. http://msdn.microsoft.com/en-us/library/bb763177.aspx [Configure WCF in asp.net Environment]


  5. http://msdn.microsoft.com/en-us/library/bb398785.aspx [Web Service in asp.net]


  6. http://peterkellner.net/2008/09/14/wcf-web-service-json-vs2008/ [Article that discussed the same concept]

Thursday, January 8, 2009

Controls that are not compatible with UpdatePanel controls

We all know that update panel is one of the wonder of asp.net Ajax and really gave a very good first impression on everyone. After mounts past some problems are starting to popup as some of the controls are not compatible with update panel. 

We might need to use other tricks to achieve required feature while using the bellow controls. I have done a little research on Update panel and found that bellow listed controls are not compatible with UpdatePanel.

The following ASP.NET controls are not compatible with partial-page updates, and are therefore not designed to work inside an UpdatePanel control:

  • Treeview
  • Menu control
  • FileUpload
  • HtmlInputFile.
  • GridView
  • DetailsView
  • Login
  • PasswordRecovery
  • ChangePassword
  • CreateUserWizard    
  • The Substitution control

We might skip Updatepanel or use some kind of trick to overcome the problems with the above controls while using Updatepanel.

Source

http://msdn.microsoft.com/en-us/library/cc295545.aspx