Thursday, December 25, 2008

Multiline editable combo in WPF

Today I am going to share a interesting learning experience that I had about editable combo box. In one of my project we have a requirement that all editable text need to support  multi-line support. very easy stuff. Just set IsEditable property of combo box to "true".

   1: <ComboBox x:Name="ddlCombo" 

   2: MaxDropDownHeight="200"  

   3: FontWeight="Normal" 

   4: Text="{my:CellEditorBinding}"  

   5: BorderThickness="0" 

   6: Padding="0" Margin="0" 

   7: IsEditable="True"  

   8: Foreground="Black" />


Now, the problem is, in couple of our grid cell we had combo box with editable feature. User can write their own choice or they can pick a value from the drop down list. since the text box of combo is a text editing area. clients wanted warp text with new line in the edit area of the combo box. After few minutes of "R & D" we discovered the way to override the control template and modified the textbox of combo box in such a way so that it can take multi-line and warp text content in combo box.


To give a textbox warped text feature i just added the following code, and it will do the job.


   1: <TextBox x:Name="PART_EditableTextBox"

   2:             Style="{x:Null}" 

   3:             Template="{StaticResource ComboBoxTextBox}" 

   4:             HorizontalAlignment="Left" 

   5:             VerticalAlignment="Center" 

   6:             Margin="3,3,23,3"

   7:             Focusable="True" 

   8:             Background="Transparent"

   9:             Visibility="Hidden"

  10:             TextWrapping="Wrap" 

  11:             AcceptsReturn="True"                                 

  12:             IsReadOnly="{TemplateBinding IsReadOnly}"/>


Best of luck and happy programming.

Thursday, November 6, 2008

Light box effect with WPF.

Light box effect is becoming a trend to show modal dialog in both web and desktop applications now a days. In WPF we can also achieve this goal with little effort. Its not actually a light box but give users a elusion of a light box.

Wpf Container controls display last element of the logical tree on top of all visual elements. we have used that feature to produce this effect. First of all we are going to add a grid as the root element of a page or window, and we are going to add the dialog XAML as the last child of the grid.


<Border x:Name="panelDialog" Visibility="Collapsed">
<Grid>
<Border Background="Black" Opacity="0.49"></Border>
<!--While Xmal Content of the dialog will go here-->
</Grid>
</Border>


Just put two function for hide and display the dialog. Total Code is given bellow. In bellow code I have Displayed a loading screen with light box effect. When displaying modal dialog just invoke show and hide wait screen methods. Its good to send your cpu expansive jobs to background thread and use dispatcher to update UI while you are in background thread.


XAML CODE


<Page x:Class="Home">
<Grid>
<ScrollViewer HorizontalScrollBarVisibility="Auto" VerticalScrollBarVisibility="Auto">
<!--All the contents will go here-->
</ScrollViewer>
<Border x:Name="panelLoading" Visibility="Collapsed">
<Grid>
<Border Background="Black" Opacity="0.49"></Border>
<local:TMEWaitScreen></local:TMEWaitScreen>
</Grid>
</Border>
</Grid>
</Page>


C# CODE


#region About Wait Screen
/// <summary>
/// Show wait screen before a web request
/// </summary>
public void ShowWaitScreen()
{
Process del = new Process(ShowWaitScreenUI);
Dispatcher.Invoke(System.Windows.Threading.DispatcherPriority.Normal, del);
}
private void ShowWaitScreenUI()
{
panelLoading.Visibility = Visibility.Visible;
}
/// <summary>
/// Hide a wait screen after a web request
/// </summary>
public void HideWaitScreen()
{
Process del = new Process(HideWaitScreenUI);
Dispatcher.Invoke(System.Windows.Threading.DispatcherPriority.Normal, del);
}
private void HideWaitScreenUI()
{
panelLoading.Visibility = Visibility.Collapsed;
}
#endregion


Best of luck and happy programming.

Friday, October 24, 2008

Display html Content in WPF (XBAP)

Story of displaying html content in WPF or XBAP (WPF browser application) begins with a simple requirement, we have to show printer friendly version(which is a html content) on few reports in our project that run on Internet and which is a WPF browser application. Well it is a quite simple requirement and most of the application needs such kind of printer friendly version that run on web. There are several techniques or solutions to this problem we are going to take a look each of a kind in short.

WPF Frame Element

First of all we are going to see a simple solution to this problem. WPF have an element called Frame element. Frame element is used to display wpf  page and user control. We can also use a frame element to show our html contents. User need to set the source property of the "Frame" to Uri of the Html Page. Here is a simple code example that shows how to do that.

<Grid Height="300" Width="479">
<Frame x:Name="myframe" Source="C:\TabotGenerator\TestXbap\HTMLPage1.htm"></Frame>
</Grid>


Few things must need to take in concern before using frame wpf frame or other elements don't support uri other than the site of origin in partial trust mode. so report handler html or aspx or custom handler must be in the site of origin. And while navigating the source must be marked as a Absolute Uri using the "UriKind" Enum.


Open a new Browser Window


Second solution to show html page in wpf is to use a navigation window object of wpf. Its kind of a mini browser where any wpf page or any resource that is viewable can be loaded. The following code snippet will show how to use a navigation window to show html page.


NavigationWindow window = new NavigationWindow();
Uri source = new Uri("http://mydomain/myapp/report.aspx", UriKind.Absolute);
window.Source = source;window.Show();


In the same category we can also use Hyperlink to Popup more traditional kind of browser window, that is popup a IE browser window just like traditional printer friendly version on sites. but to lunch a new browser window target name property must be set to _blank or some thing like that. bellow code snippet is given. Note that hyperlink element is created inside a label. WPF is by designed like this. hyperlink must be inside text elements for example label and text block.


<Label>
<Hyperlink TargetName="_blank" NavigateUri="http://mydomain/myapp/report.aspx"></Hyperlink>
</Label>


3.5 SP1 Web Browser Control


Microsoft dot net framework 3.5 Service pack one is equipped with a new control type called web browser control. Web browser control is a very smart control supporting navigation to normal Uri source and also displays html content dynamically. User can set its source property to display html page which is traditional way just like two above mentions technique. Web browser control also support three life saving methods.


Uri source = new Uri("http://mydomain/myapp/report.aspx", UriKind.Absolute);
WebBrowser browser = new WebBrowser();
this.Content = browser;browser.Navigate(source);
browser.NavigateToStream(new FileStream("Pathofthehtmlfile",FileMode.OpenOrCreate));
browser.NavigateToString("<html> whole html content </html>");


Among the above mention methods “NavigateToString” is very usefull in case we need to display html content which is available to us as a string data. And we don’t have to use any printer friendly handler page on the source of origin site in this case. We can retrieve our printer friendly html content using a string content and then just use NavigateToString to display the conent. We can also use template html to generate html content for printer friendly version.


Using Windows Forms Web Browser control


In case we are not using dot net framework 3.5 sp1 we can still implement the technique to display html content directly in browser without having a ASPX handler page in the site of origin of the XBAP. We are going to use a legacy browser control of window forms. Window forms have a built-in browser control from the release of Microsoft .net framework 2. We can also use this control using this legacy browser control via windows forms host control of WPF.


<Grid Height="300" Width="479"><WindowsFormsHost Name="windowsFormsHost1" /></Grid>


System.Windows.Forms.WebBrowser browser = new System.Windows.Forms.WebBrowser();
windowsFormsHost1.Child = browser;
//do assign the html content directly
browser.DocumentText = "our html string";
//or do assign the uri of the html page
Uri source = new Uri("http://mydomain/myapp/report.aspx", UriKind.Absolute);
browser.Navigate(source);


Conclusion


Using the above solution one thing must be kept in mind that any time you can encounter with the system.net.permission error or perhaps partial security violation error. for this you need to modify your code in such a way so that you can get the best out of it. In my case I will use the new 3.5 sp1 browser control. I will retrieve the html content via some web service or WCF service and then assign the string to web browser using navigate to string method. Best of luck and happy programming.

Thursday, September 11, 2008

Install WCF & Asp.net in IIS7

II7 is the default Internet information server for Window vista and window server 2008. In few cases I found that WCF and asp.net 2.0 is not working in iis7. This short of problem is often encountered, if you install dot net framework first and then install IIS7.

To resolve any kind of issue regarding this short of problems an easy way out is to reregister asp.net to IIS and register service model stuff to iis7.

Register Asp.net

To register asp.net go to your visual studio command prompt and type "aspnet_regiis -i" this will install and set all configuration to iis7. provided you have dot net 2.0 and later available in your machine. window vista by default have dot net 3.0.

Register WCF

To register wcf service to iis you got to run another tool called "ServiceModelReg.exe" this tool is located in "C:\WINDOWS\Microsoft.NET\Framework\v3.0\Windows Communication Foundation" directory. Provided that "c:" contains your windows directory. open the command prompt and go to the above mentioned directory with "cd" and run "ServiceModelReg.exe -i", that's it you are done. 

A Special note

Same procedure can be used to resolve any issue in widows XP and windows server 2003. To work above things in windows vista you must run the command prompt with "run as administrator". For this right click on the command prompt and select run as administrator.Best of luck and Happy programming.

Thursday, August 7, 2008

Window Close Event of Browser

"Window close event of browser"... people is searching for this key sentence for long and found some solutions also. But sorry to admit that there is no direct support for detecting the window close event of browser or perhaps browser's tab in html or JavaScript. All we have few nice trick of html DOM(document object model) event which is used to simulate the browsers close event. Not all the codes work fine, or we can say that not all code work on all conditions.

onbeforeunload or onunload

Two of the most popular event of html DOM that is used to detect browser's close event is "onunload" and "onbeforeunload". Using onunload is pretty strait just subscribe the JavaScript event. "onunload" work okay on IE(Internet explorer) but doesn't work fine in Mozilla firefox on the other hand "onbeforeunload" works okay on both IE and firefox, so using "onbeforeunload" is safe. Lets look at a strait example how this is accomplished.

<script language="JavaScript">
window.onbeforeunload = WindowCloseHanlder;
function WindowCloseHanlder()
{
window.alert('My Window is reloading');
}
</script>


As you can see this approach is pretty strait and suppose to work. But it doesn't work always, in fact it doesn't work at all! well these two event fires each and every time on these operations.


  • post back
  • navigate to another page
  • refresh
  • close the browser
  • close the current tab

There could be more cases that I haven't encountered yet or failed to mentioned, but these are the most renowned cases. As you can see that the first three cases happens very frequently, so this technique does not work. Yet there are other solutions for overcoming the problem. Here is a forum discussion on that http://codingforums.com/archive/index.php?t-37279.html. You can find more discussion if you Google it.


Extending the onbeforeunload technique


If we handled the case of post back, navigate and refresh, "close event" detect will be fulfilled. So we are going to use some old fashion technique to handle that. If you want to perform any operation in html using mouse, you have to click on some kind of html element to do that. And that's why we will trap the mouse down event. We will mark any kind of mouse down on link, button, and any element so that when post back or navigate we can detect that, its happening because of user interaction on page. Next we will trap any special key event to make the page refresh or reload, for instance pressing Ctrl+f5,f5 and Ctrl+R can make the page refresh so we will also mark such kind of keyboard operation. So we will mark any kind of keyboard event and any kind of mouse event, other than those already mentioned case we are not marking the Alt+f4 or the browser or tab close. So if our window close event fires it happen definitely because of closing the browser or closing the tab. Bellow a simple code snippet is given to demonstrate the idea.


<body onbeforeunload="doUnload()" onmousedown="somefunction()">
<form id="form1" runat="server">
</form>
</body>
<script language="javascript" type="text/javascript">
var isClose = false;
//this code will handle the F5 or Ctrl+F5 key

    //need to handle more cases like ctrl+R whose codes are not listed here
document.onkeydown = checkKeycode
function checkKeycode(e) {
var keycode;
if (window.event)
keycode = window.event.keyCode;
else if (e)
keycode = e.which;
if(keycode == 116)
{
isClose = true;
}
}
function somefunction()
{
isClose = true;
}
function doUnload()
{
if(!isClose)
{
alert('window is closing');
}
}
</script>


Conclusion


As we have already discusses that there is no 100% full proofed way to detect the browser close event in lot of case the above technique can failed, for example if the user kill the browser's process from task manager there could be many more cases. Yet in lot of case this technique can be handy. Best of luck and happy programming.

Thursday, July 17, 2008

A beginner's guide to WCF in XBAP

Contents

  1. Development Platform
  2. Introduction
  3. Prepare the stage
  4. Creating the projects and necessary files
  5. Configure the WCF for XBAP
  6. Consume WCF Service from XBAP
  7. Debugging WCF Service
  8. Deploying your solution
  9. Using the WsHttpBinding configuration
  10. A quick discussion on Data Transfer Limit
  11. Conclusion

Development Platform

  1. Visual Studio 2008
  2. Dot net framework 3.5
  3. IIS 5.1~7
  4. IE7/Firefox 2.x
  5. Asp.net 2.0
  6. Windows vista/xp

Introduction

Windows presentation foundation in short, wpf is Microsoft’s new user interface technology. Wpf introduced with the release of dot net framework 3.0. Wpf comes with lot of promises, for example, it can be used to show very rich graphics centric 2D and 3D models. WPF uses the client machines graphics capability to full extent. For more information about wpf please visit www.windowclient.net. In this article we will discuss about using wpf in web! It sounds a very strange wish to accomplish. But it’s true; wpf can be used in browser. This special browser centric package called WPF Browser Application. XBAP stands for XAML Browser Application which is the eventual output of WPF browser application. The main purpose of XBAP is to introduce a fat client application which runs on client side and provide the user an ease of desktop application in web. XBAP use the resources of client machine, that’s why .net framework must be installed in client machine to run WPF browser application. Even though XBAP uses client machine's resource and memory but it run in a sandbox environment, this mode of sandbox called the partial trust mode. XBAP in dot net 3.5 have few improvement over 3.0. Using WCF in partial trust mode is one of them. In this article we will see the implemention of WCF service in XBAP partial trust mode.

Prepare the stage

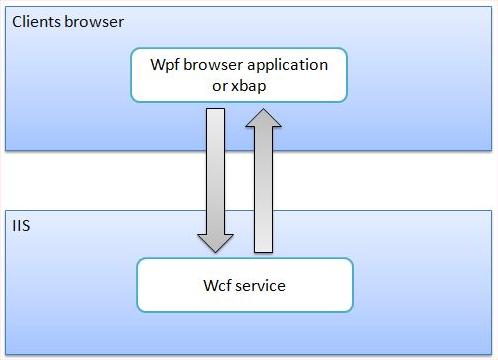
Learning by example is always a very good way of learning new things, that’s why we are going to develop a simple XAML browser application in which we will display a to-do list and notes of a user and of course going to use WCF to communicate with our data layer. Few things must be clear before jumped in to the stage. In partial trust mode XBAP can consume WCF service from the site of origin only. So we cannot use a cross domain WCF service from XBAP. Another restriction we have in case of WCF binding configuration, we can use only BasicHttpBinding and WSHttpBinding in partial trust mode. For retrieving, creating, deleting and updating tasks we will use BasicHttpBinding. On the other hand to retrieving, creating, deleting and updating notes we will use WsHttpBinding. Let’s go through the projects templates first. We will of course create a WPF Browser application Project, Next we are going to create a WCF Service Application Project and Finally we are going to develop a simple web site (web application project of vs2008) where our browser application will be hosted. We will use a SQL express edition database in data service layer that is a “tododata.mdf” we will construct our own user base and user validation. WPF browser application will forward all request to a WCF web service. WCF service will do business logic validation and retrieve data from data access layer. Bellow here is a simple diagram to presented how the application architecture will be.

XBAP-WCF.JPG

Creating the projects and necessary files

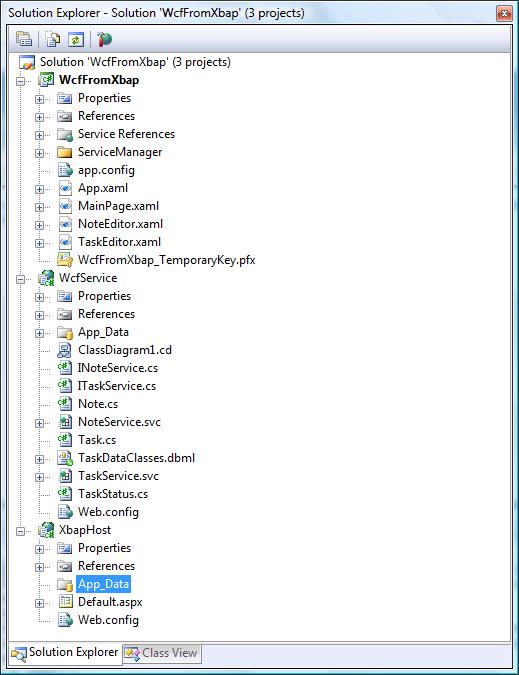
By now we already know that we are going to create three different projects. So let’s get started, we will start with creating a blank solution for our convenience. Go ahead and create a blank solution in vs2008 and save the solution to your convenient place with a convenient name. Now add a new WPF Browser application project to the solution. Then add a new WCF Service Application to the solution and lastly add a new web application project to the solution, that concludes the projects creation process. To save the data we will use sql express database, so let's go ahead and add a Sql server database file and name it to your convenient. Then create necessary tables for task, notes and users. Next we need a simple mechanism to retrieve, save and to modify data from the database, for this we are going to use LINQ. Add a dbml file to the wcf service project drag and drop the data tables from database explorer to the dbml. Next we have to define our service interfaces. We will have two services in the same wcf project one for notes (INoteService) and other one for tasks (ITaskService).

Projects.jpg

Configure the WCF for XBAP

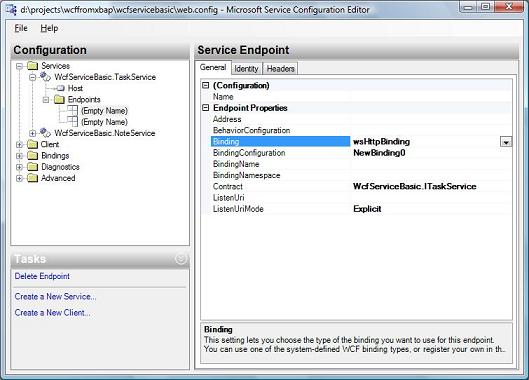
If you are new to wcf I would like to suggest you to spend some time on msdn library learning wcf. So now we have our wcf service application “WcfService”. Now we are going to configure our wcf service so that our XBAP can consume this service. By default when users add a wcf service, visual studio automatically configure two end points for the service. We are going to modify the binding configuration for our service so that XBAP can communicate with it. Visual studio 2008 provides a nice tool to edit wcf service configurations, and the tool is “WCF Service Configuration Editor” we will edit service configurations with this tool, you can also modify the web.config manually to setup appropriate markup under service model section. By default when you right click on web.config of service no edit configuration tool is shown, to make it show first we have to run it from the tools menu of visual studio 2008. Click on the tools menu of the visual studio 2008 and click on wcf configuration menu. Now you can close the tool. Once you have opened the tool it will be available for the current session. Now right click on the web.config file of the wcf service project and select “Edit WCF configuration”. Configuration editor will pop up with the entire configuration that is defined in the web.config. In configuration editor on the left side you will find a tree with service information’s populated. Expand the services node and you will see a node named “Endpoints”. By default under endpoints node there are two pre-added endpoints, one endpoint configured with WsHttpBinding and another is configured with MaxHttpBinding. Now select the endpoint that is configured with WsHttpBinding. After selecting the endpoint, properties of that end point will be shown in property editor on the right side. Change the binding property to WsHttpBinding to BasicHttpBinding. Click on file and save and close the tool.

ServiceConfigurationEditor.jpg

Now it’s time to host the service to a location so that our application can consume it from a fixed location. When we added the wcf service application by default visual studio 2005/2008 configure the service to run on visual studio development server. We are going to modify this to run from IIS. For this right click on wcf service project and select properties. After project properties window popup, navigate to web tab and change the server configuration under servers section from “Use Visual Studio Development server” to “Use IIS Web server” after that you need to click on create virtual directory button to finish the process. Now save the project. And you are all done configuring the service for you xbap. If you are in windows vista you can encounter with few errors, to overcome the problems you must run visual studio with “run as administrator” mode.

Consume WCF Service from XBAP

The hard part is now over, just add a service reference like normal procedure i.e. right click on project select “add service reference “ after add service reference window popup, click on discover button. You will see the service will be found and URL will be added to the address textbox. Click okay and you are all done.
Because of the previous action that is performed appropriate mark up will be added in the app.config under service model configurations section. The markup that is added look like this


<system.serviceModel>
<bindings>
<basicHttpBinding>
<binding name="BasicHttpBinding_IService1" closeTimeout="00:01:00"
openTimeout="00:01:00" receiveTimeout="00:10:00" sendTimeout="00:01:00"
allowCookies="false" bypassProxyOnLocal="false" hostNameComparisonMode="StrongWildcard"
maxBufferSize="65536" maxBufferPoolSize="524288" maxReceivedMessageSize="65536"
messageEncoding="Text" textEncoding="utf-8" transferMode="Buffered"
useDefaultWebProxy="true">
<readerQuotas maxDepth="32" maxStringContentLength="8192" maxArrayLength="16384"
maxBytesPerRead="4096" maxNameTableCharCount="16384" />
<security mode="None">
<transport clientCredentialType="None" proxyCredentialType="None"
realm="" />
<message clientCredentialType="UserName" algorithmSuite="Default" />
</security>
</binding>
</basicHttpBinding>
</bindings>
<client>
<endpoint address="http://munna.kaz.com.bd/TODO.SERVICE/Service1.svc"
binding="basicHttpBinding" bindingConfiguration="BasicHttpBinding_IService1"
contract="TodoServiceReference1.IService1" name="BasicHttpBinding_IService1" />
</client>
</system.serviceModel>


Debugging WCF Service


While developing XBAP sometimes developers need to debug the
application. Developer may needs to investigate what data is received
to the service and what data is transmitted from the service. Well,
since WCF works in XBAP only in partial trust mode it’s become a little
bit difficult, but not yet that much difficult. While debug from visual
studio 2008 we can set the “trust mode” to full trust. You can set
trust mode to full trust from security tab of project properties. This
will enable your WPF Project to debug in application in development
environment. But while deployment you must change trust mode back to
partial trust otherwise you will encounter with trust not granted error.


Deploying your solution


First of all developer needs to set XBAP’s security mode to partial
trust. In publish wizard first step is to specify where you want to
publish the binary. Browse and select a folder as convenience. Click
next will guide the user to select next option which is selection of
how the user will install the application. In this screen developer
needs to select “from a web site” option and specify the location of
the web site. Browse or put down the location of the web site. While
deploying your solution you must be careful about the deployment URL
and the URL or the WCF service that is defined in the app.confiq of the
XBAP. In app.config let’s say you have an end point with
http://localhost/wcfservice you should also put your XBAP deployment
URL as http://localhost/xbaphost. If you in app.config you have
localhost but you browse as http://{pcname}/xbaphost things won’t work
and you will end up with a code access security violation exception. So
you must remain consistent about the URL of WCF Service, XBAP Host, and
the URLS.


PublishWizard.jpg


Using the WsHttpBinding Configuration


You can also use WsHttpBinding to communicate with the wcf also, but
few things need to configure to ensure that you don’t suffer from code
access security exception. If you want to use WsHttpBinding you don’t
have to create any new binding. Visual studio 2008 by default creates
two end points for a wcf service application one is WsHttpBinding and
another is MaxHttpBinding. What developer needs to do is to configure a
new binding configuration. To accomplish this edit the web.config of
WCF Service application. In default window you will see first endpoint
is configured with WsHttpBinding and under the endpoint a default
binding is configured, it should say “(Default) Click to Create” just
click to create new binding configuration and configure it not to use
reliable session and security mode to None. Bellow the service mode
configuration is provided for better understanding; eventually WCF
Configuration Editor will generate this sort of markup.


<system.serviceModel>
<bindings>
<wsHttpBinding>
<binding name="NewBinding0" messageEncoding="Text">
<reliableSession enabled="false"/>
<security mode="None">
</security>
</binding>
</wsHttpBinding>
</bindings>
<services>
<service behaviorConfiguration="TESTWCF.Service1Behavior" name="TESTWCF.Service1">
<endpoint address="" binding="wsHttpBinding" bindingConfiguration="NewBinding0"
contract="TESTWCF.IService1">
</endpoint>
<endpoint address="mex" binding="mexHttpBinding" contract="IMetadataExchange" />
</service>
</services>
<behaviors>
<serviceBehaviors>
<behavior name="TESTWCF.Service1Behavior">
<!-- To avoid disclosing metadata information, set the value below to false and remove


the metadata endpoint above before deployment -->
<serviceMetadata httpGetEnabled="true"/>
<!-- To receive exception details in faults for debugging purposes, set the value below


to true. Set to false before deployment to avoid disclosing exception information -->
<serviceDebug includeExceptionDetailInFaults="false"/>
</behavior>
</serviceBehaviors>
</behaviors>
</system.serviceModel>


Make sure that you set enable reliable session to “false” and set
security mode to “none” in both client endpoint and service’s endpoint
binding configuration. Otherwise XBAP can suffer from code access
security exception.


A quick discussion on Data Transfer Limit


XBAP to WCF communication data transfer have few limitations in data
transfer size. If you are transferring huge list of objects that
exceeds the size specified in max buffer size and max receive size in
web.config application will cause receive limit exceed exception. You
can increase the size of the maxBufferSize and maxReceivedMessageSize
from web.config in binding configuration section of service, but
increasing its size will cause the application suffer from code access
permission exception. So a very straight forward way to escape from
this issue is to make your service in such a way so that you don’t
return data that exceed the size limit. And if you have huge data to
transfer, change the service contract in such a way, so that you can
transfer data in multiple requests, and in every request size limit
should remain under the maxBufferSize.


Conclusion


In few cases you will see that service is taking a little bit time
to respond to your request, and that can cause your application to
become irresponsive for few seconds. To escape from this problem you
can use background process to call the WCF service, and display a wait
screen to the user and hide the wait screen after the process finished
execution. That concludes a beginner introduction to xbap to wcf
communication.

Sunday, June 22, 2008

Improved Resource file project template in vs2008

Visual Studio 2008 resource file project template is now more improved! and more usable.It has very user friendly and easy to edit environment, providing the user with the ease of managing resource better than ever. I have been using resource file since Visual Studio 2003. Previously I got to write code and use resource manager to pull the resources from the embedded resource file. And there are maintenance hassles to load a resource only once. We did lot of engineering previously to resolve the easy management and developer friendly architecture for resource accessibility. Now resource management with Visual Studio 2008 resource file template is a child's job.


What can be added in resource file


Now we can add different type of resource file just with few mouse click, isn't it great. Okay, here is the list of file type you can add as a resource file in resource file template.

  • String
  • Image
  • Icon
  • Audio
  • Files
  • Other(Virtually every thing!)


So there is lot to work with resource file. The magic is you can add these files with drag and drop from any location. Adding resources is that much easy. Still you have some traditional way of adding resource, you can add new resource and also add existing file from the disk. for this we have to click on "Add Recourse" button in Resource Management Window.


Access Modifier


Resource file and its type has few access modifier just like our class access modifier. If you set access modifier as "No code generation"  no designer generated code will be generated! ... this means now we don't have to write any manager class to manage and pull the resources from embedded resource file if we choose access modifier other than "No code generation". Here are the options we have in access modifier.

  • Internal
  • Public
  • No code generation


Visual Studio 2008 will automatically write a class and code for you so what you can access your files right way. This is one of the major improvement in resource file template of Visual Studio 2008. If you set access modifier as "Internal" your resource can only be accessed from the container project of the resource file, that implies what you can not access resources, that are marked as internal, from out side the project. So of course setting the access modifier to "Public" will made our resource accessible from any where.


I have used string file in in couple of my projects and did all custom codes to manage those. Now I use resource file right way because its so easy. Here is a view what designer generates for you.


Resource File "IntelliSense"


Since we have a designer generated code so we can use the class right way in our code and also enjoy the facility of intellisence. A very beautiful feature is that if we will get the object as typed object, means if we added string type it will give use string object, and if we have added image in our resource file it will return a Image Type object. so its pretty smart and we can bind it to a Image Control to display it.


Well another thing that I want to share, that, its has different type of view in resource manager window. we can switch to thumb nail mode if we are using image and easily locate which image we are looking for. Of Course we can also filter our resource using resource type selector.

NOTE: Each Resource is added against a key so. Key must be unique.

Thursday, May 8, 2008

Using Background Process in WPF

WPF applications often needs to call time consuming methods or processes, the time consuming methods or processes can be, huge time consuming calculation or perhaps a web service call. In case of WPF specially XBAP (wpf browser application) which run on remote client machines browser, this sort of calls can make your user interface unresponsive.  I am working with WPF for more than four month. Lot of things come in to way and dealt with nicely. Well in this post I am going to share a simple trick for avoiding unresponsiveness of user interface. We have already used this technique in many cases in our application, but this is for WPF.

The "Thread & Invoke"

BackgroundWorker is a very smooth and useful tool for our purpose of making more responsive UI(user interface). Before discussing more about BackgroundWorker lets take a flash back of legacy technique (which is pretty smart)  implementation of making  more responsive UI. Previously I used threading for implementing such kind of UI smoothness. What I did is to create a background thread and call expansive operation on that thread. When the job is finished use the "MethodInvoker" method to let know the UI thread that the job is finished. And this model is called asynchronous model. And this is quite smart model and rest of the models are based on this approach. Here is a quick code snippet for demonstration the technique.

//first start the method with tread
System.Threading.ThreadStart ts = new System.Threading.ThreadStart(ExpansiveMethod);
System.Threading.Thread t = new System.Threading.Thread(ts);
t.Start();
protected void ExpansiveMethod()
{
//Very expansive call will go here...
//after the job is finished call method to update ui
MethodInvoker updaterMI = new MethodInvoker(UpdateChange);
this.BeginInvoke(UpdateChange);
}
protected void UpdateChange()
{
//again back to main ui thread
}


The "Background Worker"


Okay, its time to use the BackgroundWorker. An amazing thing about background worker is, its simple to use.  First, lets see what a background worker is. "BackgroundWorker" is a class under "System.ComponentModel" which executes an operation on a separate thread. Which is introduced from dot net framework 2.0. Things are again pretty simple just like tread, All you have to do is instantiate a BackgroundWorker and subscribe its events, and call the "RunWorkerAsync()" method. Lets put a code snippet. Since we are programmers we understand code better.


void MyMethodToCallExpansiveOperation()
{
//Call method to show wait screen
BackgroundWorker workertranaction = new BackgroundWorker();
workertranaction.DoWork += new DoWorkEventHandler(workertranaction_DoWork);
workertranaction.RunWorkerCompleted += new RunWorkerCompletedEventHandler(workertranaction_RunWorkerCompleted);
workertranaction.RunWorkerAsync();
}
void workertranaction_RunWorkerCompleted(object sender, RunWorkerCompletedEventArgs e)
{
//Call method to hide wait screen
}
void workertranaction_DoWork(object sender, DoWorkEventArgs e)
{
//My Expansive call will go here...
}


As you can see in above code I have subscribed two event "DoWork" (which is the main function) and "RunWorkerCompleted", In dowork event handler we will put our expansive time consuming operations, as the name imply's RunWorkerCompleted event is fired when the work is finished . BackgroundWorker also has "ProgressChanged" event which is used to let the main UI thread know how much work is completed.


The "Dispatcher"


In few cases the BackgroundWorker needs to access the main UI thread. In WPF we can use "Dispatcher" which is a class of "System.Windows.Threading" and a delegate to access the main thread. First of all we have to declare a delegate for our candidate methods, and then use the delegate to call the method using Dispatcher. Dispatcher has few thread priority and you can use various priority from DispatcherPriority enum. "Send" has the highest priority in DispatcherPriority.


//delegate for our method of type void
public delegate void Process();
//and then use the dispatcher to call the method.
Process del = new Process(UpdateMyUI);
this.Dispatcher.Invoke(System.Windows.Threading.DispatcherPriority.Background, del);
void UpdateMyUI()
{
//get back to main UI thread
}


For more reading about this Asynchronous Programming please visit the references.


Reference


Thursday, April 10, 2008

Wpf Image ,Working with Image Source

Hi after a long time I am back in my blog. In this post I will discuss few things about WPF image object. Recently I have been working in a project whose UI Layer is build entirely with windows presentation foundation.

Background

WPF has another way to display image. That is, using BitmapImage object. You can declare BitmapImage tag and in WPF XAML just like Image tag. But in case of BitmapImage the source property is a Uri name is UriSource. Luckily BitmapImage is the source property of Image. Here is a simple code segment of Image and BitmapImage.

ImageSource & BitmapImage

WPF has another way to display image. That is, using BitmapImage object. You can declare BitmapImage tag and in wpf xaml just like Image tag. But in case of BitmapImage the source property is a Uri name is UriSource. Luckily BitmapImage is the source property of Image. Here is a simple code segment of Image and BitmapImage

<Image Width="200" Margin="5" Grid.Column="1" Grid.Row="1" >
<Image.Source>
<BitmapImage UriSource="sampleImages/bananas.jpg" />
</Image.Source>
</Image>

Mouse hover effect

Bellow I have listed few lines of code when i change the image in mouse enter and mouse out of an image object. Of course I am using Uri to define the location of my image then using the Uri to make a new BitmapImage and finally use BitmapImage to assign Image.Source Property.


1: private void btnGoToHome_MouseEnter(object sender, MouseEventArgs e)


2: {


3: this.Cursor = Cursors.Hand;


4: Uri src = new Uri(@"C:/Images/DifferentTransaction_Icon_Active.png");


5: BitmapImage img = new BitmapImage(src);


6: btnGoToHome.Source = img;


7: }


8:


9: private void btnGoToHome_MouseLeave(object sender, MouseEventArgs e)


10: {


11: this.Cursor = Cursors.Arrow;


12: Uri src = new Uri(@"C:/Images/DifferentTransaction_Icon_Normal.png");


13: BitmapImage img = new BitmapImage(src);


14: btnGoToHome.Source = img;


15: }


That's it you are done


Reference


http://msdn.microsoft.com/en-us/library/system.windows.controls.image.aspx

Thursday, March 6, 2008

No Scroll content of wpf xbap in iframe

In my previous blog post i have discussed about how to hide the navigation ui of xbap while you hosting Xbap ( Xaml browser application) in iframe. Note that xbap can be accessed directly from browsers url address and can also be viewed in a iframe in existing web site. In both case user can have contents that requires scrolling.If user developed the xbap application in such a way that the application will be accessed directly form url address, user can archive the goal by adding a "scrollableview" element in your xmal page. bellow a code sample is provided.

   1:  <Page x:Class="CookieTest.Page1"

   2:        xmlns="http://schemas.microsoft.com/winfx/2006/xaml/presentation"

   3:        xmlns:x="http://schemas.microsoft.com/winfx/2006/xaml"

   4:        Title="Page1">

   5:      <ScrollViewer>

   6:          <Grid>

   7:              <!--your content will go here–>-->

   8:          </Grid>

   9:      </ScrollViewer>

  10:  </Page>


Next case is if user hosted the xbap application in a iframe. In this case there is a good chance that user will be viewing two vertical scrollbar in user's browser if users existing site's page is long enough to cause view a vertical scroll bar, that is the browser's vertical scrollbar. Xbap host have a defined size, which generally as long and wide as the browser window. So if your content is longer than the size of xbap host, you can loose your content from viewable content area. or you will end up having two scrollbar.Well there is several solutions to this problem. Lets discuss with a simpler version. Make the iframe's height property as long as the xbap that is hosting the xbap. And make sure that your xbap will not grow larger than that. but if your xbap has variable content and has variable height and you got to keep the constant look you need to do some engineering to keep things smooth.Xbap do support get and set of cookie in the site of origin. so do calculate your height for your content in xbap and then set the height as a cookie, make sure you do set the height of the content as a cookie each time the content of xbap has changed, of course in case of the content that cause the xbap to change its size. here is a code example to set cookie for site from xbap.


Application.SetCookie(BrowserInteropHelper.Source, "HEIGHT=" + DemoHeight );


Now in the page, where you hosted your xbap in iframe read the cookie with javascript and the change the height of the iframe. that's it you will have a smooth operation of auto grow or shrink of your xbap and wont cause any extra scrollbar. for reading the cookie do a little engineering for example always track the height cookie with javascript timer based function.


   1:  <script language="javascript" type="text/javascript">

   2:  function getCookie(c_name)

   3:  {

   4:      if (document.cookie.length>0)

   5:      {

   6:        c_start=document.cookie.indexOf(c_name + "=");

   7:        if (c_start!=-1)

   8:          {

   9:          c_start=c_start + c_name.length+1;

  10:          c_end=document.cookie.indexOf(";",c_start);

  11:          if (c_end==-1) c_end=document.cookie.length;

  12:          return unescape(document.cookie.substring(c_start,c_end));

  13:          }

  14:      }

  15:      return "";

  16:  }

  17:  function InCreaseHeight()

  18:  {

  19:      var hight = getCookie('HEIGHT');

  20:      if(hight != "")

  21:      {

  22:          if(document.getElementById('framename')!=null)

  23:          {

  24:              if(hight<600)

  25:              {

  26:                  hight = 600;

  27:              }

  28:              document.getElementById('framename').height = hight;

  29:          }

  30:      }

  31:      setTimeout("InCreaseHeight()",250);

  32:  }

  33:  </script>


one more thing do call the javascript increase height function on body on load event of the page to kick start the process.


   1:  <body onload="InCreaseHeight();">


Reference:


http://www.w3schools.com/js/js_cookies.asp
http://msdn2.microsoft.com/en-us/library/ms750478.aspx#Cookies


Thursday, February 7, 2008

Hide Navigation UI (back, forward button) of Xbap application

Xbap application can be used directly in browser or can be used in a iframe in a web page. when you use directly in browser, browsers nagivation ui is used as xbap navigation UI . But if you use xbap in a iframe xbap host automatically add two back forward button and add a navigation header to your xbap application. if you are using the xbap in a existing web page and in a iframe this cause a little bit problem.

but we can hide the navigation ui very easyly... all we have to do is to set the wpf page object's ShowsNavigationUI property to false... thats all... you are done. But if you are using an "user control" as startup object there is no way to set the property. This works only in case of WPF Page project item template.

But you can still hide the navigation UI... on application's contractor subscribe the navigated event ..

public App()
{
this.Navigated += new NavigatedEventHandler(App_Navigated);
}

void App_Navigated(object sender, NavigationEventArgs e)
{
NavigationWindow ws = (e.Navigator as NavigationWindow);
ws.ShowsNavigationUI = false;
}

Monday, January 28, 2008

Creating web application and web site that run in IIS 7 of windows vista from vs2008

While creating a web site in vs2005 or vs2008 , web site location has three options and the options are 1. File System 2. HTTP 3. FTP

image

Previous version of Visual studio (VS2002,VS2003) supports web application that run only on IIS. User can easily create web applications cause Visual Studio automatically guide the user to create a web application. Since vs2005 come with whole new application suite for example, Web Site template , web application template and mix mode of Ajax templates user had options to chose between many things. I personally used IIS and File System web site and web applications (File System web run on Vs integrated vs development web server ) in windows XP. I have recently moved to windows vista and and VS2008 Team System. I found some interesting stuff regarding windows vista and vs2008 that I thought need little share with the community (might help some one).

Web site in VS2008 on windows vista that run on IIS

image

I wanted to create a web site in IIS so I opened vs2008 selected ASP.net "Web Site" project template and Choose Local IIS but I found a strange message and unable to proceed to create a virtual directory from the wizard. I didn't read the message carefully, I thought my IIS is not installed properly or my IIS is not running. I opened my IIS administration MMC from administrator tool and found that IIS is up and running well, then I got confused and performed the same site creation operation again. This time when the Local Internet Information Server tab got selected I read the message carefully and it says how to create web site from vs2008, and it says I got to run vs2008 with "Run as administrator" :)

image

I closed my IDE and opened IDE from start menu with "Run as administrator" options selected from right click menu and performed the same operation again, this time every thing worked just okay :).

image

Web app in VS2008 on windows vista that run on IIS

While creating a "web application" project (which is created via choosing new project, rather than new web site from File->New menu) user do not have any option to select between File system or IIS hosted project in project creation wizard. By Default a File System based web application is created for the user. Just follow the normal procedure to create a web application, after web application creation is completed select the project properties. When the project properties window appear select the Tab named "Web*". You will see in web tab by default "Use Visual Studio Development Server" option is selected. change it to "Use IIS Web Server" option. After that just click on the Create Virtual Directory button to finish the procedure. save the project and you are good to go.

image

Oh one more thing, for this operation, again you have to run IDE in Run as administrator mode.