Thursday, November 5, 2009

How to check if WPF control is in design mode

Probably you all know it, still sharing it with the community. The trick is pretty simple and worth knowing. Here is the summery.

Problem: The wpf designer can not render the control

Reason: In constructor of the control some data service is been called which is available only in runtime.

A method from System.ComponentModel.DesignerProperties would save our soul this time, the method name is “GetIsInDesignMode”. Using this method you can check if the control right now is been in design mode or not, and don’t call any data service if its in design mode, Isn’t it pretty simple. Bellow a sample uses is given.

if (DesignerProperties.GetIsInDesignMode(new DependencyObject()))
{
     ///your code goes here
}

References

http://msdn.microsoft.com/en-us/library/system.componentmodel.designerproperties.getisindesignmode.aspx

Friday, October 2, 2009

Turn Spell check on your WPF Text input controls.

Probably all of you know it, still want to share this simple trick that I learn, and it is “How to turn spell check on your wpf text input controls”.

What property do turn it?

SpellCheck.IsEnabled = “True”

This functionality is defined it System.windows.controls.spellcheck class, and the attach property SpellCheck.IsEnabled can be used with Textbox and RickTextBox control.

Note that appropriate language pack should be installed in the system to get full spell check support.

Unfortunately didn’t find defaults for adding new item to the dictionary, but found some articles on the net to handle the add to dictionary.

Happy coding.

Thursday, September 3, 2009

How to work in really local repository with svn.

Two things, First “I don’t want to install a source control repository”, second, “I want the source control in my local machine” finally “I want the facility to check in, check out and keep source history”, That’s actually three things, well what come in my mind is the Tortoise SVN facility.

Create A local repository

Here is how we can do the local repository, first install TortoiseSVN, its totally free so no need to worry about any licensing issue. After successful installation, select any folder from your file system, and right click on that repository. Now from TortoiseSVN menu select “Create repository here”.

image

It is going to take only a second to finish the process, Walla your local repository is created. And you will get a confirmation  like the bello window. After that you can choose to created default folder structure. Next step is to add a solution to this local repo.

image

Adding source in source control

Open your desired solution in your visual studio ide. right click on solution explorer solution file, and select Add solution to Source control. Since I have a VS plugin for svn I will get window like bello screen. It’s recommended that you add a visual studio svn plugin like Visual SVN or Ankh SVN in your development machine.

image

Click on to finish the process and you will get log message entry window.

image

Type your comment and then click ok, that’s it you have a local repository up and working for you.

Check in and checkout

Bellow I have provided the pending checking window screenshot, after adding the project you might want to add every thing un-committed to the source control.
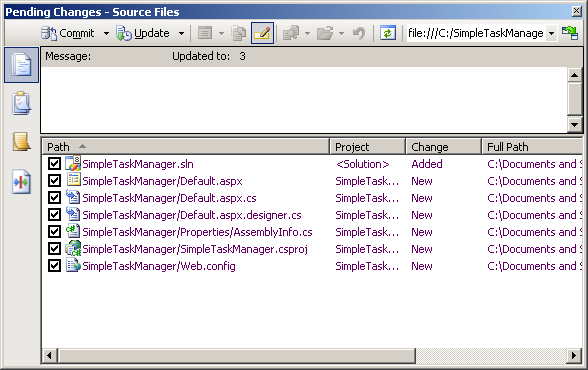
image

History

Since you have your source control you can now check in and checkout any file, and also keep history and ability to revert the changes if anything goes wrong.

image

More over you can track history to find out any changes that is done in the source control.

image

Its fun and no worry to loose your code anymore. But I would recommend that you use a svn server, because your machine could crash, but server will have backup facility.

Until next time, me signing out cya.

Thursday, August 6, 2009

AnkhSVN : a free and full integrated SVN tool for VS IDE.

Subversion integration with VS IDE is one of the necessary things as far as Integrated development is concern. A lot of develop still do folder based file system Update, Merge and Commit while working with code based which has a source control in Subversion.

Nowadays, since the we all want the luxury of having everything accessible through visual studio ide, why not also svn. There are two important tool that come to my mind right way for svn integration.

  • Visual SVN

  • AnkhSVN

No doubt that Visual SVN is a wonderful tool that have full integrated feature with visual studio, but main problem with it is that its not free and a commercial tool. If we use express edition of visual studio and want svn integration we might not want to pay for it.

There AnkhSVN wins, its totally free, for distribution and use. The tool is can be download from http://ankhsvn.open.collab.net/. Ankh SVN is fully integrated and free tool for svn support in visual studio.

Features are given bellow and taken from the AnkhSVN Site.

Features

Pending Changes window

  • One window to handle the normal workflow.
  • Real-time overview of all project changes.
  • Easy access to most Subversion commands.

Merge Tracking

  • Easy-to-use wizard simplifies merging.
  • Wizard is merge-tracking aware.
  • Intuitive integrated conflict resolution
  • Supports all merge scenarios supported by Subversion 1.5/1.6
  • Works with Subversion 1.5+ servers, and pre-1.5 servers.

Optimized workflow

  • Don't leave your IDE for most common operations.
  • Immediately view the source control status of all files in your project/solution.
  • View working copy information such as last committed author, last committed date and the repository URL.
  • Import new solutions automatically.
  • Get support for all Subversion transfer protocols.

Pluggable diff/merge

  • Plug in your diff/merge tool of choice
  • Smart command line templates for the most common merge tools.

Repository Explorer

  • Easily browse any Subversion repository.
  • View extended information about remote files and directories in the Visual Studio Properties window.

License

  • AnkhSVN 2.1 is licensed under the open source Apache 2.0 license.

After installation we can use and when we add the our solution to source control the solution explorer is pretty much looks like the following screen shot.

image

Bellow the pending checking window for AnkhSVN is given.

image

Hope you will like this tool and use open source solution. Until next time cya.

Friday, July 3, 2009

Most common design principles

“In computer programming, SOLID (Single responsibility, Open-closed, Liskov substitution, Interface segregation and Dependency inversion) is a mnemonic acronym introduced by Robert C. Martin in the early 2000s which stands for five basic principles of object-oriented programming and design.” by Wikipedia

Most common and famous design principles are given bellow. And some rapid fire definition to remember. Often I wonder what is the best way to train you so that you always follow the design principles. Best answer is there is non, and practice is the key to success.

What is more important?

Design Pattern, Design Principles, Code Smell, or refactoring, an honest answer is all of them. So if we want to become more productive developer and enhance the learning and knowledge we ought to learn and get by heart those key words and practice them.

Until next time, happy coding.

Friday, June 5, 2009

How to add scrollbars to ItemsControl on WPF?

 
There are two ways to do this. The simpler and most easier way is to warp the ItemsControl with a ScrollViewer, but there are some other problems on this solution. Each case we might want to use ScrollViewer. In those case we can modify the  control template and add proper code in ControlTemplate so that we do not have any problem layout.
 
Bellow few simple line of codes is given to demonstrate the idea.
<ItemsControl ItemsSource="{Binding EventWithoutDateColumns}" Margin="10">
<ItemsControl.Template>
<ControlTemplate>
<ScrollViewer x:Name="ScrollViewer" Padding="{TemplateBinding Padding}">
<ItemsPresenter />
</ScrollViewer>
</ControlTemplate>
</ItemsControl.Template>
</ItemsControl>

There are some other way to do that, and that is, to use styles and also apply the style globally so that it effect the whole application. In this way the whole application will have ScrollViewer with particular style in every ItemsControl.


Bellow few simple line of code is given Bellow.


<Style TargetType="{x:Type ItemsControl}">
<Setter Property="Template">
<Setter.Value>
<ControlTemplate>
<ScrollViewer x:Name="ScrollViewer" Padding="{TemplateBinding Padding}"
HorizontalScrollBarVisibility="Disabled"
VerticalScrollBarVisibility="Auto">
<ItemsPresenter />
</ScrollViewer>
</ControlTemplate>
</Setter.Value>
</Setter>
</Style>

Hope this helps to somebody, Cheers.